Sunday, June 28, 2009

The Batik Braid Quilt Tutorial

Welcome to my Braided Quilt Tutorial. This tutorial is just a "how I did it" and "this is how it turned out" kind of tutorial. The one jelly roll makes a nice lap sized quilt, roughly 50" square.
--------------
Edited to add- It has been pointed out to me that the math for this tutorial is off a bit, for a standard jelly roll. The jelly roll I used is from Walmart. (My current wallies still sells fabric.) I think there might be more strips in their roll or something because I used the math listed below and I even have pieces left over. BUT if you are using a traditional 40 strip jelly roll- you'll need to divide your 7 x 2.5" strips {there should be 240 of them} equally in to then start the tutorial. (8 piles of 30 strips OR maybe 6 piles of 40 strips.)
-------------

The following directions are for the quilt I made, with the roll from Walmart. Here's how it shakes down:


I took the plunge and decided to finally cut into my jelly roll pack. I own 5 packs (well, 4 now) But I've been hesitant to cut into the beautiful strips... 'til today. LOVE these batik fabrics, by the way!!!

I made the quilt by cutting the jelly rolls into 7" lengths. (2.5" x 7") I then sorted the strips into 7 piles of 40 pieces each.
Then using one stack of 40 at a time, start sewing in the above fashion. I grabbed the strips quite randomly, so the quilt has that absolutely scrappy feel. Stitch them in the order illustrated above, alternating right and left sides.

Next you have to trim the long braid. You'll trim it twice; the sides and the ends. First trim off the triangles on the sides. My strips turned out to be about 8" wide. (The picture below represents all 40 strips, not just the 10 or so shown.)

Next you'll need to square up the top and bottom ends. (The picture below represents all 40 strips, not just the 10 or so shown.)The long strips will not have intersecting seams, so its ok to square off the ends at "the point where you run out of fabric". Does that make sense?

After the 7 wide braided strips are complete & square, ya just sew them together. When the quilt top is complete, you will need to go back with your rotary cutter and trim the top and bottom edges so they are flush and even with one another.

Go forth and cut into those jelly rolls!!!

Lets talk quilting. I'm thinking I should quilt this in a colored thread. Which color are you guys thinking? Blue, Pink or Brown?

If you make it, feel free to share it in the ReannaLily Designs Flickr pool.

~jen~
Share/Bookmark

Sewing by Hand


The water soluble pen is kinda hard to see in the photo, but looks fine in person.

I wanted to get some hand-sewing projects ready in case I have some extra time on my hands. (HAHAHA!) But seriously, I've got this grand idea to have flowers, embroidered in a rainbow of colors, to be used as the corner stones in my Rainbow Quilt Sampler top. Yes, the swap ended months ago and I still haven't assembled my sections yet. I think I cut up 42 or so 7" white squares and spent yesterday leisurely marking them all. The flower design can be downloaded in a pdf form here. Or you can find it at www.reannalilydesigns.com click on the patterns link and scroll down. Lets see how many I get finished!
Share/Bookmark

Wednesday, June 24, 2009

Etsy Shop

I wanted to make a quick little post this morning to tell you about all the great things in my Etsy pattern & supplies shop. The shop is located at www.reannalilydesigns.etsy.com


I have my own patterns listed there, as well as some designer de-stash fabrics and some vintage bed linens. (Recycled sheets, if you'd rather call 'em that.) There are many listings for vintage sheets already cut into quilter's Fat Quarter {18"x22"} pieces. I have some retro pillowcases and as luck would have it, I've listed a few Seamingly Accurate's over there as well. You've got to check it out. Also, with every purchase I'm giving away a free free free pattern!


Enjoy the shopping and browsing over on Etsy. Have a great Tuesday! ~jen~
Share/Bookmark

Toot Toot.


I'd like to take a moment from our regularly scheduled sewing and quilting blog to toot my own tiny horn. I entered a Logo Design contest for a local club and I won! Its a military spouses group, hence the yellow ribbon. I personally like that where the letters "ASC" are, you can remove those and use the logo for all sorts of name tags or invitations. So there ya have it. My design is now the official logo for the club. toot toot.
Share/Bookmark

Tuesday, June 23, 2009

Lets Recycle MORE

Can a girl have too many purses??? I don't think so. What does bamboo, linen, belt loops and dinner napkins have in common....


I recently went thriftin and found tons of great items. Also in that mix were some dinner napkins. After my last dinner napkin purse (which I carry everywhere- its the perfect size for summer), I decided I'd need to make another dinner napkin bag.

So I've got the napkins. I did need to come up with a great handle design. I own a few pair of those bamboo ring handles and I've been itching to use them. They just say summer and tropical and warm weather- so bamboo handles it is! {and they're circles!}


But... I wanted to have the same nice rectangle shape AND the bamboo handles, that meant I had to think up a way to get the handles onto the bag. BELT LOOPS! They've been working for jeans for far too long. Its time we take those belt loops to a new place. If you are thinking you want to put belt loops around your bamboo handles, its a bit tricky, but not impossible, obviously.

Now lets talk lining. The bamboo is natural, eco friendly and all that jazz. The napkin is recycled and probably as old as I am. The lining... its 100% linen from a thrift store dress. Its part of the same dress from the adorable snow man tutorial. (It was a BIG dress.)

Yes. Its another magnet clasp. :) The bag gets its structure from a piece of dense quilt batting. I picked this instead of the Timtex stuff. Batting is just softer and nicer, in this case.

So there's another project crossed off the to-do list. Thanks for following along. ~jen~

p.s. The brooches aren't in this project, just in the thrift store picture. They'll be on something soon, I'm sure.
Share/Bookmark

Monday, June 22, 2009

The Thrift Haul


I actually do have a couple of blog topics to post on here- but lets shelf those for now. I want to show you the great thrift store finds I scored in Dayton.

I'm reasonably sure that circle mirror above originally came from Hobby Lobby. Its about 12" across and looks lovely in my room.

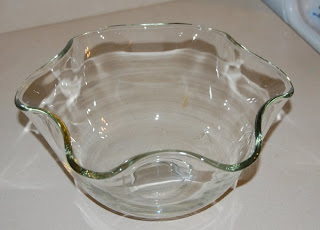
Then I also got some unique things for around the house. First up- my favorite find from this trip, a vanity chair. The whole chair is about 30" tall and the best part- $4.99! My plan is to use it as a background for various purse photos. I mean, I can't place everything on the maroon fence in my backyard, right? I also found this great glass bowl. The bowl is so heavy. I love the shape, so now, it too, lives in my house.


I also found a few "supplies" type items while thriftin. I found a set of dinner napkins that I plan to make into purses. Recycling like a wild woman. :) I also found two great little brooches, for another project brewing in my crazy brain. And if those retro napkins and pins weren't enough- I also now have a thread cone sorter for only $3. Sure, it only holds 12 cones and I own about 3 times that many, but its a start.


Today, I plan on sewing, sewing, sewing. I've got much to do before the birthday marathon month of July here at my house. Here's hoping I can get it done!
Share/Bookmark

Sunday, June 21, 2009

Where was I???

Boy, its been a week or so since my last post. Sorry about that. I went on a little road trip with my family up to Dayton Ohio. Its a two day drive from my place up to Dayton, but when the hubby's work is paying for the hotel and my super great friend lives there... I might was well tag along, right??

We did all sorts of stuff there- but I won't bore you with the details. What I will tell you is that my friend an I arranged her bookshelf. (Stick with me, it isn't boring, its artsy-)

We sorted the books by the color wheel and we even have a warm shelf and a cool shelf. I just love it. I need to do this to my own books. Oh, by the way, these are all her quilt and sewing books.


Then, among other places, we went to the rockin A.W.E.S.O.M.E Fabric Shack in Waynesville Ohio. I'm guessing you already know about The Fabric Shack. It is absolutely HUGE. They've got a whole room of clearance fabrics. They have more fabric than I've ever seen. I might have left with over 7 yards of super fun great prints from all sorts of manufacturers.


And the highlight- THE FABRIC SHACK carries Seamingly Accurate! It was right there behind the check out counter on the notions wall. I was hoppin' up and down excited to see it. My friend snapped a picture and I'll add it to this post when I can get that from her. (updated & added below!) Thank you Fabric Shack!!!


Of course, Dayton has some amazing thrift stores, and I got the haul there too. I'll have to post a whole seperate bit on that.

I had plenty of time to fill up the sketch book and write out many to-do lists. I'll be back to "workin" soon. I hope you had a great week!!
Share/Bookmark

Wednesday, June 10, 2009

Rockin' Pattern Pieces

And just a bit more about the circles...

My dad is a thinker. He often says "You know, if a person were to..." And then you really have no idea what the next part of the sentence will be. In fact, when he says it, its like one word- "ifapersnwertah" Usually, the second half of the sentence is somewhere between MacGuyver and Creative Dad. You really never know. Well- I think I've got a bit of that inherited from him. Pretty good trait, if you ask me.

As I'm making and tracing all these circles it dawned on me- "Ifapersnwertah get a circle template... things would be so much easier." So this person, yours truly, promptly got a circle template. Wanna know what it is? (You know, I love the thrift store. Turns out, I don't own any vinyl, myself.)

Yes, I added my logo to the record. I thought it'd be fun to have a ReannaLily Designs ROCKIN record template. And I bet you're wondering what I did with the 12" template?

I made 4 fabric circles and two batting circles. The fabric is Alexander Henry again. For today's circle project I wanted to make a quilted bag. The ladies in my guild LOVE stuff like that. Quilted wearables. I generally don't love quilted wearables, but I thought I'd try to "hip" up the idea.


The circle purse is soft and quilted in a 2" grid. You can probably see it if you enlarge the photo. This circle purse is, of course, 4" (diameter) smaller than the original. The fabric on the outside of the bag is a big floral and the lining print is the coordinating small floral that matches. I did put a drop-pocket inside there. I have to tell you, the QUILTED circle purse might just sway me over to the quilted wearables.

Oh, and a side note- the quilted purse was much easier to make & work with than the stiff interfacing circle purse.

Have a great day! I hope you have a "Ifapersnwertah" moment today to make your life easier. Be proud, too, of the self restraint I've used, in not applying every Rockin, Record, or Musical pun possible, in this post. :)

~jen~
Share/Bookmark

Monday, June 8, 2009

Crazy About Circles

I think I must be going through my circle phase. I'm telling you, everything these days seems to need a circle on it. First there was the Floating Bubbles Quilt. The sister quilt to Floating Bubbles is almost ready for release- and if quilts weren't enough...


Check out this complete circle purse. I'm diggin it. The idea came to me at the thrift store this past weekend. I started obsessing over the pattern elements and shape while I should have been sleeping. I'm guessing most people do that sort of thing.

(My 6yo- He's not really a hand model, as you can see by the nails.)

I decided this first circle purse was going to test my idea. For that reason, there are no pockets inside the 16" beast. I used the more really stiff interfacing from the Wal*Mart. I don't love the Wal*Mart, but my town is very small, and they've kinda got the market cornered. (And who doesn't love a run-on sentence?)


All in all the pattern worked out really well. The faced handles look pretty good. I enjoy it.

Its kinda fun to have a complete circle purse in my collection of bags. It goes well with The Cube. Looks like I need to add a triangle variation to round out my set. :)

Updated to add: The fabric is all Alexander Henry.

~jen~
Share/Bookmark

Monday, June 1, 2009

The Yellow Napkin

I went thriftin' today! Man, I love thriftin. ...especially when I find linens and table linens. Today I scored a lonely little yellow framed linen napkin that needed a little love.

First, I drew up a little flower to embroider on the corner. This napkin told me it needed a flower, and who was I to argue?

I took the time to draft up that flower in illustrator for you, in case you were diggin it and wanted to put it on something of your own. Find the pdf here. You can also find it on The Patterns link of my ReannaLily Designs website. The flower fits in a 6" x 6" square. I do think you can use the "scaling" feature on your printer to make the flower any size you want, though.

Now, I've got this great linen napkin with a smokin black line flower on it... I was absolutely inspired to make a bag similar to the one on Sew Mama Sew- its a tutorial by Jennifer Ladd. Mine is constructed differently and has different handles, but the shape is the same so I thought I'd mention it.

Hum... that's mostly me and my fence. Here's a better one. What can I say, its a small clutch.

I didn't put any pockets in this recycled wonder. I figure, its a clutch. Grab it, throw the keys, wallet and cell in there and you probably don't need any extra pockets. I did use a magnet clasp closure though. I think I might be turning into a magnet clasp junkie! I suppose there are worse kinds of junkies, right? The bag is lined with mottled yellow fabric and uses sew-in, crazy-stiff interfacing. (found the interfacing in the Wal*Mart remnant bin!) It holds the shape quite nicely.

So that's all the news worth shouting today. Enjoy. ~jen~

If you make it, feel free to share it in the ReannaLily Designs Flickr pool.
Share/Bookmark