
I'd like to tell you about needles.
When you get your sewing machine, your first one, it might come with a needle in it. Or you might read the instructions to pop it in there the first day. In most of the classes I taught, I learned that many people were scared to touch the needle or switch it for any reason. Let me tell you, you need to switch it.
SHAPE: Needles are sized and shaped for each project. Straight needles are for woven fabrics (like quilter's cottons or most curtain fabrics) and needles with a little "bulge" by the eye are called Ball Point Needles and are designed for knits (like your t-shirt fabrics).
SIZE: Aside from the basic shapes, needles also have sizes. Now, both Ball Points and Striaghts are numbered from about 9 to 16. The Lower the number the Lighter weight the fabric. See, you keep the L's together to remember that. The Higher the number the Heavier the fabric. You keep the H's together to remember that one. A 9 needle would be perfect for a chiffon, batiste, or see-through fabric. The 16 is more for denim or maybe even light vinyl/leather sewing. (If you chose to sew on leather.) An 11 is perfect for most of your quilting projects and a 14 is great when you are quilting through the 3 layers of your quilt.
SHARP: Along with shape and size, there's also sharp to consider. This just means, after a project or two of your needle zippin' away through many many fabric pieces, it gets dull- just like a knife. So you'll need to take the time to switch it or else it will break, bend or just stuff the starting ends of your fabric pieces down in that little hole on the sewing machine.
YOUR PLAN: What you do is- Pick your project fabrics (woven or knit) then assess your weights (you might have 3 different needles on one project, its ok.) Then stand in the notions isle of your favorite sewing shop and stock up!
THE FLAT SIDE: One last thing, on the top (machine side) of your needle shaft- one edge is flat. Not only does that keep it from rolling off the table, but it allows you to put the needle in your machine correctly every time. The flat edge faces the back. It faces away from you. Tighten the screw and start sewing!
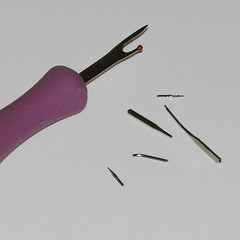
MY PHOTO: So armed with all this information- what the heck is going on in my picture??? Well, I under estimated how heavy my layers of fabric were for my project. At first I thought, yes, this needles is dull, I'll just replace it with another 14. Then after I broke the second one I realized- yes, I just need a 16. Goodness.
NOTE: You can also sew over pins, reasonably safely... although there is an argument that it will dull your needle faster. I don't know if I buy that. Also, you CANNOT sew over the metal ends of plastic zippers! No matter how you think you've pinned it out of the way, or made the opening just the right length... if you're wrong, your needle will break. {Good thing your comfortable with replacing them now!} Sew cautiously over the ends of those zippers, and extra cautiously if you've chosen a zipper with metal teeth.
Please take the time to switch your needles. There will be much less breaking and much more happy-sew-time if you just give yourself two seconds to be confident in switching them.
I hope the 2-cents on Needles was helpful. Have a good one! ~jen~
SHAPE: Needles are sized and shaped for each project. Straight needles are for woven fabrics (like quilter's cottons or most curtain fabrics) and needles with a little "bulge" by the eye are called Ball Point Needles and are designed for knits (like your t-shirt fabrics).
SIZE: Aside from the basic shapes, needles also have sizes. Now, both Ball Points and Striaghts are numbered from about 9 to 16. The Lower the number the Lighter weight the fabric. See, you keep the L's together to remember that. The Higher the number the Heavier the fabric. You keep the H's together to remember that one. A 9 needle would be perfect for a chiffon, batiste, or see-through fabric. The 16 is more for denim or maybe even light vinyl/leather sewing. (If you chose to sew on leather.) An 11 is perfect for most of your quilting projects and a 14 is great when you are quilting through the 3 layers of your quilt.
SHARP: Along with shape and size, there's also sharp to consider. This just means, after a project or two of your needle zippin' away through many many fabric pieces, it gets dull- just like a knife. So you'll need to take the time to switch it or else it will break, bend or just stuff the starting ends of your fabric pieces down in that little hole on the sewing machine.
YOUR PLAN: What you do is- Pick your project fabrics (woven or knit) then assess your weights (you might have 3 different needles on one project, its ok.) Then stand in the notions isle of your favorite sewing shop and stock up!
THE FLAT SIDE: One last thing, on the top (machine side) of your needle shaft- one edge is flat. Not only does that keep it from rolling off the table, but it allows you to put the needle in your machine correctly every time. The flat edge faces the back. It faces away from you. Tighten the screw and start sewing!
MY PHOTO: So armed with all this information- what the heck is going on in my picture??? Well, I under estimated how heavy my layers of fabric were for my project. At first I thought, yes, this needles is dull, I'll just replace it with another 14. Then after I broke the second one I realized- yes, I just need a 16. Goodness.
NOTE: You can also sew over pins, reasonably safely... although there is an argument that it will dull your needle faster. I don't know if I buy that. Also, you CANNOT sew over the metal ends of plastic zippers! No matter how you think you've pinned it out of the way, or made the opening just the right length... if you're wrong, your needle will break. {Good thing your comfortable with replacing them now!} Sew cautiously over the ends of those zippers, and extra cautiously if you've chosen a zipper with metal teeth.
Please take the time to switch your needles. There will be much less breaking and much more happy-sew-time if you just give yourself two seconds to be confident in switching them.
I hope the 2-cents on Needles was helpful. Have a good one! ~jen~
5 comments:
Great info on needles! I buy mine by the gross, from atlanta thread supply, I do alot of machine quilting on my bags. They almost always break before they wear out. So important to match the needle to the project!
Thank you so much for the tutorial. Just as a note, the reason needles are not supposed to be sewn over is because it can mess up the timing of the machine, so the machine will not stitch properly, which then generally requires taking the machine into the shop to get it re-timed.
oops, that should be, the reasons pins are not supposed to be sewn over...
thank you.. i am a self taught sewist, and i have never heard that much info. you explained it so well.
This is a great tutorial, thanks!
Post a Comment