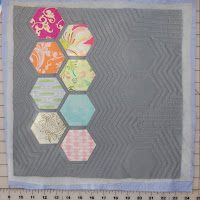
This is the 2nd part in a 3 part tutorial to make a small very gift-able project. This second part will tell you how to quilt an orphan block. You can use your quilted block to add into a "quilt as you go" style quilt, or make it into something else completely. In this case, our block isn't an orphan, exactly, but you could certainly use any extra quilt block and apply this idea. (See how we made the block here.)
Supplies:
Any unquilted quilt block you may have lying around (The directions for making this one can be found here.)
Batting slightly larger than the quilt block (I used wool, by Hobbs.)
Backing fabric slightly larger than the quilt block
Water Soluble marking pen
Matching thread
 Step 1: Pin baste the three layers together to make a quilt sandwich. The layers are in this order:
- backing fabric wrong side up
- batting
- quilt block right side up

Step 2: Decide on a quilting pattern. Usually, you mark the quilting pattern on the right side of the project before it is pinned to the batting and backing, but for this project, I planned on doing a more organic free-motion idea. So my plan is to echo quilt, or simply follow the shapes of the block design stitching each line about 1/4" - 3/8" from the previous line.

Step 3: If you are making and quilting the hexagon block from the Modern Hexagon Block tutorial, now is the time to whip out one of those extra paper hexagons. I decided to trace three hexagons onto the block, to replicate the motif on the right and left sides of the project.
Step 4: Trust yourself. This is a small quilted project and its the perfect time to try out a new idea or style. Go for it! I decided to change up my echo quilting, slightly, to add visual interest to my solid color fabric. There are no *real* rules. On my design, I did want to keep the consistent echo quilting look in a sort-of modified echo.
Step 5: Remove the water soluble pen with a damp wash cloth.
 Step 6: Take the quilted block to the cutting surface.
Step 7: Trim the block square. My block started out at 14 1/2" square. After it was quilted, it shrank slightly and finished at exactly 14". That's ok. No problem.
 If you are thinking of enlarging the block a bit before you start, this would be a great placemat idea, consider using Insul-Fleece(tm) instead of batting to make your placemat more heat resistant. With a larger block this quick improvisational quilting method would make fun doll quilts or wall hangings.
 Save the block, as is, to see how we finish off the project on Friday.
Subscribe to this blog feed to get updates on the next couple steps of this project.
*Fabric used in this sample is by Art Gallery Fabrics + Kona Cotton Solid
If you make it, feel free to share it in the ReannaLily Designs Flickr pool.


2 comments:
Very cool looking! We are thinking of starting a Modern Quilt Guild out here. I'm going to remember this little tutorial!
This quilt is beautiful-- thanks for the tutorial!
Post a Comment